1,2,3…4&5
Yield: 1- Matchbox
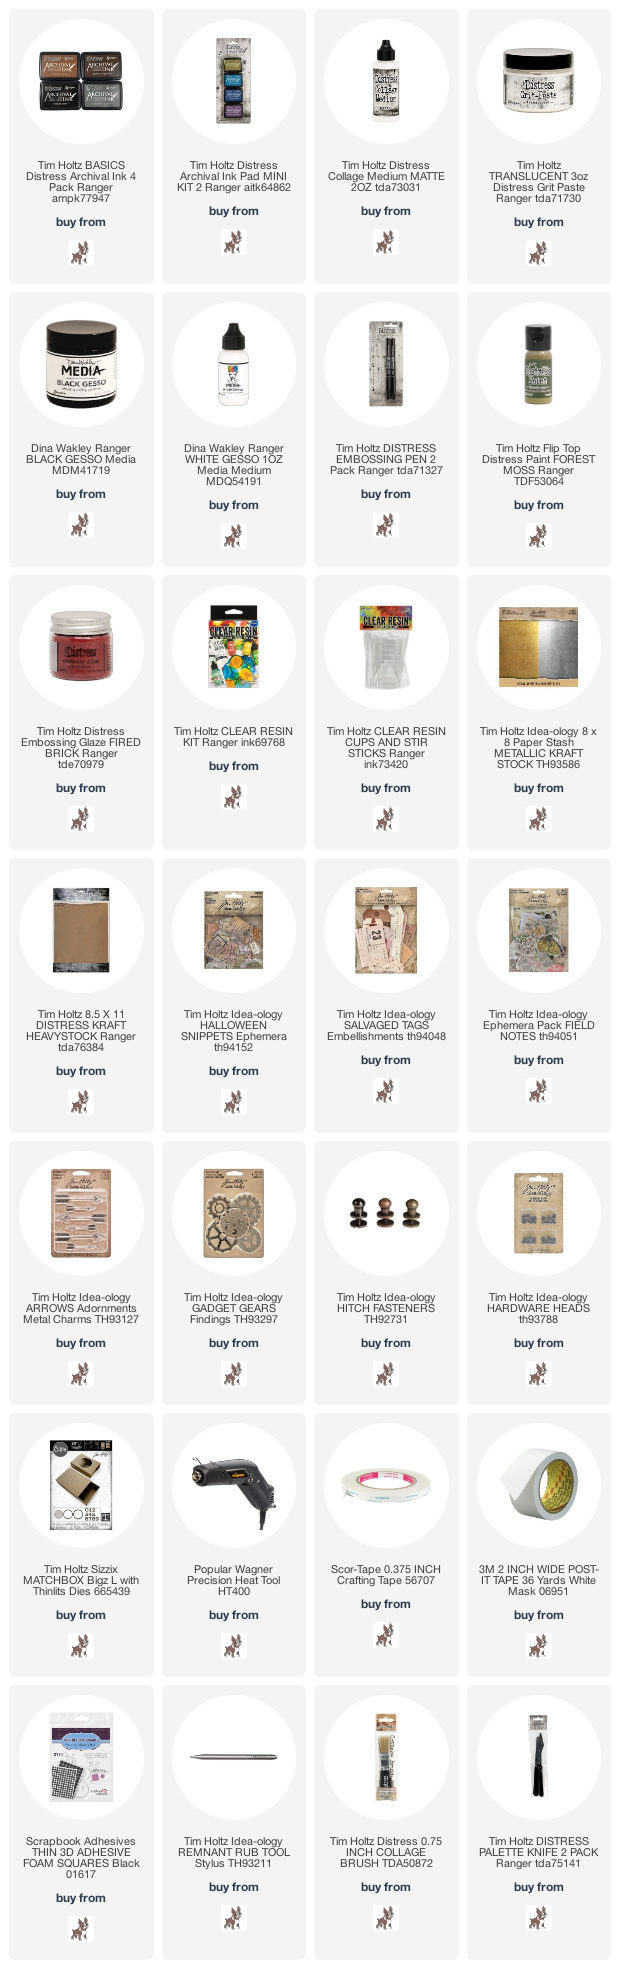
Wet Ingredients:
Ink –Archival Hickory Smoke, Peeled
Paint, Vintage Photo
Other – Collage Medium (matte); Embossing
Pen (Brush), Gesso (black & white), Grit Paste (translucent); Resin Kit (and
set of mixing cups)
Paint – Distress Forest Moss
Dry Ingredients:
Paper – Distress Kraft Stock, Metallic
Kraft Stock
Paper –Ephemera (field notes),
Salvaged Tags, Snippets (Halloween)
Embossing Glaze – Distress Fired Brick
Hardware – Adornments (arrows), Gadget Gears, Hardware Heads,
Hitch Fasteners
Other – Adding Machine Key
(personal stash), Letterpress, Remnant Rubs (numbers)
Ribbon – Eclectic Elements Thread
Tools/Equipment:
Other – Butane Torch, Collage Brush,
Craft Mat, Foam Tape (Black), Heat Tool, Level, Media Mat, Needle Tool, Palette
Knife, Pin, Post-It Tape, Remnant Rub Tool, Sanding Grip, Steel Wool
Dies – Matchbox (Bigz & Thinlit set)
I want to start off by expressing to you that this is not a project that can be completed start to finish quickly, the setting, drying and curing time of resin is dependent on a variety of environmental factors. Making just one of these (as I did to create this tutorial) is not as efficient as making multiples. The Ranger Clear Resin Kit will make four filled matchboxes - they take roughly one ounce to fill depending on the volume of displacement by the objects you have included. I did need to purchase a second kit to complete the five boxes I created for the Tim Holtz Chapter 3 Sizzix release of the matchbox die with the new thinlits included. These little treasure boxes are well worth the time they take to make (I already have plans to make some of these for Christmas gifts).

You need to collect an assortment of items for the dimensional collage. You will inevitably compile more items than you can possibly use, this is a great way to use up those things you only have 'one of' left in your stash. Some items will be too big to play together or too tall to fit in the matchbox (I cut down the height of the letterpress number with a Dremel tool to make it fit).
I cut a base of Distress Kraft Stock to build the matchbox 'insert' on.
The collage is sealed with collage medium and a coat of collage medium is applied to the backside as well as the edges of the paper.
Each new layer (no matter what is made of) get a layer of collage medium to seal it.
Air pockets will create air bubbles, you need to fill any void and undercuts that the item you have selected my have. The more voids the more air pockets you will eventually have to work to chase the air bubbles out of. I can't emphasize enough how much attention to this now will make this less challenging for you later. Look at the underside of everything.
Once the insert collage is completely assembled set it aside to let all your adhesives not just dry but cure. I used collage medium to glue everything and left it to cure while assembling the matchbox box and sleeve. (at this point I'm wishing I was making more than one of these)
The blackening of the inside edges of the box helps to contrast and highlight the collage. The blackening of the edges of the sleeves helps maintain the illusion that this is not just paper.
When adhering the sleeve side flaps you need to leave a little underlap to help the box slide under the extra piece of paper that backs our numbers as well as the slight dome in the resin later.
I quit inking the boxes here because they are flimsy, they are paper after all, and hard to get a good hold of (this is equally true of the original five) If you wanted to skip the inking here altogether, that makes more sense to me in hindsight.
I used collage medium to attach the insert to the box with collage medium and cleaned up what oozed up the sides with a small paintbrush. Set aside to dry and cure (I took this time to clean-up, collect all the things for 'the pour' and did a Starbucks run...I would call this halfway).
These are my must-have tools when working with resin! The heat tool gets rid of air bubbles quickly but also pushes the resin around, this works well until the box is filled over halfway. The torch also takes out the bubbles without pushing the resin, it just needs to be used with extreme care as the paper box is flammable. Yes, a couple of them may have caught on fire just a little...
I know you can buy actual shims, but this is my craft room hack; scissors are wedge-shaped and the stamping block distributes the wedge over a greater area to level your working surface.
Protect your working surface with a craft mat (I have an old Ranger one saved just for resin). I used the package instructions for measuring the resin * remember it takes roughly one ounce to fill one box.. There is no way to mix the two without getting some bubbles, the slower you stir and scrap and fold them together the fewer you will get, once mixed you can see the bubbles start rising to the surface, eventually pop and clear. Ready to pour?...
The actual time this process took was close to 10 minutes.
At this point don't wander away thinking your done, over the next 20 minutes or so bubbles will start coming out of what feels like nowhere, these can be easily zapped out with the butane torch. The surface is already setting up DO NOT poke with a pin this will create more problems than living with a few air bubbles.
After a few hours, you will see the resin start to have a concave appearance as it dries in the box. I mix a very small amount of resin again and drip it on the surface until there is a thin layer covering the original resin pour and the resulting surface tension creates a dome, you will need to move your head down to the level of the project to see this happening (the photo of me picking it up is taken several hours after this step). The resin will be hard by the next day but won't be fully cured for two more.
Back to inking the faux metal box...
Here are a few photos of the original 5 that were made for release.
The collecting of all the things I wanted to use in the matchboxes was a fun way to look at a lot of things old and new in my stash. I knew I wanted to make 5 boxes total but it wasn't until the idea of a set of colour studies came to me that it was easier to create the collages. A little theme goes a long way.
This post contains affiliate links below. If you click on one of them and make a purchase I receive a commission (there is no cost to you).


These were so stunning in the live. I still remember how convincing your metal effect was you had Tim very puzzled! It is fantastic to get close-ups and all the advice and tips from your making process. Thanks so much for this very full post Vicki xox
ReplyDeleteAmazing detail in your process. Love it when I feel like I can try something new from a blog post. You have created some very cool effects. thanks as always for sharing.
ReplyDeleteHoly cannoli!!! This is incredible! You are a rock star goddess! I missed the live, but I will check it out. Thanks!
ReplyDeleteSuch a great tutorial and it was lovely to see these in the live! Your metal technique looks so realistic. I adore using resin and will definitely give these a try and you are right, they will make lovely gifts at Christmas. Thanks so much for sharing!
ReplyDeleteThanks for sharing your "what to do" and "not do". I have never worked with resin before, so your tips are very helpful and reassuring that I can do this...
ReplyDeleteJust jaw-droppingly amazing. Love seeing the collages in detail, and the resin has such a magical effect bringing everything together.
ReplyDeleteAlison x